Fig. 1a Fig. 1b
THE ULTIMATE SOLUTION TO
MEGAMINX
Recently I received an e-mail from Jerzy Wieczorek and Mark Snyder. It seems that these gentlemen have discovered that the methodology of The Ultimate Solution to Rubik's Cube could be applied to Ewe Meffert's Megaminx. While I have had a Megaminx for some time I had never tried to solve it. Behold, a little research showed that they were right.
The Megaminx, a dodecahedron, looks quite formidable. Each of the 12 faces is a pentagon. Each face has five edge pieces and five corner pieces. If one had trouble with Rubik's Cube or Rubik's Revenge, one would surely have a lot of trouble with this fiendish device. After all, the number of corners has gone from eight to 20 and the number of edges from 12 to 30. In addition, while the number of colors is the same as on Rubik's Cube (six) each color is found on two separate areas (the opposite faces each have the same color).
As with Rubik's Cube there are three kinds of pieces on this puzzle. The face center cannot move relative to the other face centers but may rotate. Each edge piece has two different colors and may be moved freely about the Megaminx. Each corner piece has three colors and may also be moved about the entire puzzle.
But there are major differences. For each color combination (say green and orange) there are two identical edge pieces. Either one may be placed between a particular pair of green and orange face centers. This can present a problem as will be discussed later. There are also two different corner pieces with the same set of colors, for example, the green, orange and blue corners. However, these corner pieces are not identical. Rather, they are mirror images of each other. You might be confused by the colors but you will certainly not put the wrong corner piece into any given corner. (Or rather, perhaps, you will not leave it there.)
The steps in solving the Megaminx are similar to those for Rubik's Cube. But there are also significant differences. While the Edge Piece Series still has four turns each turn is 1/5 of a full rotation or 72o. The series still involves two adjacent faces and causes three edge pieces to move about a given corner piece. In the first turn, edge piece #1 replaces #2 and in the second turn #3 replaces #1. Turn three is the reverse of turn one and turn four is the reverse of turn two. Hence, this is virtually identical to the Edge Piece Series for Rubik's Cube.
Step One: The Star
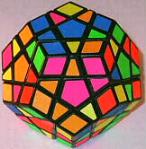
Hold the Megaminx with any one of the faces on top. I will use a blue face. That is, there is a blue face center on the top face. The other pieces may or may not have a blue color on the top face. You will find that there are five faces, with five different colors in the center, each with an edge in contact with one of the five edges of the top blue face (see Fig. 1a).
Fig. 1a
Fig. 1b
Bring five edge pieces with a blue color on one face and one of each of the other five colors (yellow, green, red, orange and tan) on the other face, into the upper half of the dodecahedron. By rotating the various faces place these edge pieces on the top face of the cube so that a blue star is formed on the top and the colors of the faces hanging down from the blue face match the colors of the face centers with which they are in contact.
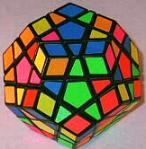
In Fig. 1a the blue/green edge piece is already in place. But you cannot put the blue/red piece in place by a simple counterclockwise rotation of the red face. The green and red colors would not have the proper relationship to each other. By looking at the red and green faces you can see that the red face must be to the left of the green face. Rotate the top face 2/5ths of a turn counterclockwise (Fig. 1b) and now a 1/5th rotation of the red face puts the blue/red and blue/green edge pieces in proper relationship to each other.
You should note that this order of red and green is not universally true. If you
had chosen the other blue face as your top face this order would have been reversed.
Now place the other three points of the star in the proper order.
Step Two: Second Level Edge Pieces
Turn the puzzle over so that the blue star is on the bottom. You will see positions for five edge pieces (placed horizontally) just above the bottom face of the puzzle. Bring an edge piece of the appropriate colors into one of the positions in the third (middle) level of the puzzle either by rotating one of the faces in the top half of the puzzle or by applying an Edge Piece Series to the appropriate edge pieces. Now apply an Edge Piece Series to move this edge piece into its appropriate position and orientation. Repeat this process for the other four edge pieces of the second level.
In Fig. 2 the yellow/orange edge piece belongs where the tan/green piece is now. It is put into place by an Edge Piece Series which begins with a clockwise rotation of the yellow face. The next turn is a counterclockwise rotation of the orange face.
Fig. 2
Step Three: Third Level Edge Pieces
There are ten edge pieces in the third or middle level. They are inclined at a slight angle to the vertical. Some of them may be moved into place by an Edge Piece Series using edge pieces in the third and fourth levels.
In some cases edge pieces already in place in the third level will prevent the use of an Edge Piece Series to place another edge piece adjacent to them. But you will always be able to put an edge piece into place in the middle level by making a simple edge piece exchange in the top level.
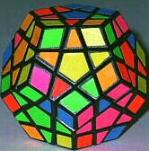
Fig. 3a
Fig. 3b
The yellow/green edge piece in Fig. 3a is already in place. The tan/red edge piece to the right of the yellow/green piece needs to be replaced by a yellow/red edge piece. If you look carefully you will see a yellow/red edge piece on the left side of the top face. A 2/5th counterclockwise rotation of the yellow face places the tan/red piece in the top face (Fig. 3b). Now a 1/5th rotation of the top face counterclockwise will replace the tan/red edge piece with the yellow/red piece (Fig. 3c). Finally a 2/5th clockwise rotation of the yellow face returns the yellow face to its starting position with both the yellow/red and yellow/green edge pieces in their correct positions (Fig. 3d).
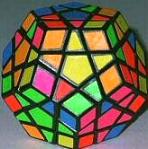
Fig. 3c
Fig. 3d
Of course the edge piece you are looking for will not always be on the top face with the proper color hanging down. But you can always apply an Edge Piece Series to move a piece from the fourth level to the top with the proper orientation or to invert a piece already in the top level.
You should also remember that there are two edge pieces for each color pair you are looking for. For example, if you turn the puzzle in Fig. 3b around you will find another space for a yellow/red edge piece on the back side. In this case the red side will be up and the yellow side will be down. In other words, if you still have two yellow/red spots to fill, a yellow/red edge piece in the top layer will fit one or the other of those spots without being inverted.
Continue placing middle edge pieces until all ten middle edge pieces are in position.
Step Four: Fourth Level Edge Pieces
Use the Edge Piece Series to move fourth level edge pieces from the top level into the fourth level where they belong. If you find a fourth level edge piece in its proper place but with the wrong orientation you will have to remove it and put it back in place but correctly oriented. As you carry out this process try to ensure that the top level edge pieces have their blue color on top.
Fig. 4
In Fig. 4 the red/green edge piece must be inverted as it moves into place in the fourth level. Therefore it must be edge piece #3. The blue/tan piece is #1 and blue/red is #2. The green face is rotated clockwise and then the blue face is rotated counterclockwise. Reverse turn one and then reverse turn two. Both the blue/tan and blue/red pieces wind up with their blue color on top.
Continue until there is one top level edge piece in the fourth level and one fourth level edge piece in the top level. You must have three top edge pieces in order and one out of order.
Step Five: Top Level Edge Pieces
Look at the top level edge pieces. First we need to find if three of them are in order. If not, choose one piece. It is #1. Piece #2 is the one with the color just to the left of color #1 on the faces below the top blue face. Color #3 is the color just to the left of color #2 on these same faces. Use the Edge Piece Series to put the blue edge piece with color #2 in the top face just to the left of color #1. Repeat this process with the blue piece which has color #3. It goes just to the left of the blue edge piece with color #2.
Hold the puzzle with the fourth level target position toward you and turn the top face so that the three top edge pieces in the proper order are in the back. One of the remaining top edge pieces should be in the fourth level edge piece position and the final top edge piece and the final fourth edge piece are in the top level. Apply an Edge Piece Series so that the final fourth level edge piece goes into place with the proper orientation and the top edge pieces are on top with their top color on top.
All thirty edge pieces have now been placed and we are ready for the moment of truth. You should be able to turn the top face so that all top edge pieces line up with the colors of the five faces below. But you have only a 50-50 chance of accomplishing this. Half of the time the last two top edge pieces will be reversed as in Fig. 5.
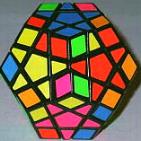
Fig. 5
This comes about because of the 15 pairs of identical edge pieces. We can assume that in the original puzzle the edge pieces were correctly placed. Every time we exchanged one of the pairs we brought about a reversal. If we did this an even number of times we would be right back where we started. But if we did it an odd number of times we would wind up with a pair of edge pieces reversed.
How do we get out of this parity problem? One way is to exchange two of these identical edge pieces. Suppose we take the blue/yellow edge piece from the top face and move it down to the second level by means of three successive Edge Piece Series. Then rotate the bottom blue face so that a rotation of the proper lower face will replace the bottom blue/yellow piece with the top blue/yellow piece. Bring the displaced bottom blue/yellow piece to the top face with appropriate Edge Piece Series. Choose these series so as to minimize the disruption to the puzzle. Repair the edge piece portion of the puzzle beginning with the second level and working your way up to the top level.
Now when three top edge pieces are put in place (in the proper order) and an Edge Piece Series is applied to the final two top edge pieces and the fifth fourth level edge piece you will find that all five top level edge pieces are in order. The edge piece reversal has been eliminated.
Step Six: Seventeen Corner Pieces
You will apply the same Corner Piece Series to put corner pieces into place as you did with Rubik's Cube, Rubik's Revenge, etc.. However, it won't look quite the same because you won't have a square on the top of your puzzle. As you looked down on top of Rubik's Cube and started the Corner Piece Series with a turn of the top face to the left you then made the left side turn away from you. Turn the top to the right and then turn the right side away from you.
Hold Megaminx so that it "points" toward you as in Fig. 6. The "right" (tan) and "left" (red) sides of the puzzle are not parallel to each other. Rather, they angle in toward each other at the back side of the puzzle. With the front "prow" of the pentagon pointing straight toward you the right side angles-in by 18o at the back of the pentagon as does the left side as well.
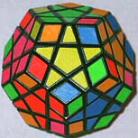
Fig. 6
When the first turn of the Corner Piece Series is to the left the corner piece at the right-front moves to the left-rear. The piece at the left-rear moves to the right-rear and the one at the right-rear moves to the right-front. In this example the tan/green/yellow piece at the left-rear rolls over and goes into proper position and orientation at the right-rear of the top face of the puzzle. The corner piece at the middle-front and the corner piece at the left-front do not move. Hence the major difference is that two top corner pieces do not move when the Corner Piece Series is applied to Megaminx while only one does not move in the case of Rubik's Cube.
Sometimes you will have to temporarily turn faces in order to form a complete triangle about which three corners can move as in Fig. 7. Here the green side may be rotated 1/5th turn clockwise and the blue-orange-yellow corner piece moves to the right-rear of the top face. That piece moves to the left-rear and the left-rear piece (red-blue-yellow) moves into position and orientation at left-front. The piece at left-front moves to right-rear. At the completion of the Corner Piece Series the green face is rotated 1/5th turn counterclockwise.
Fig. 7
As you work to move corner pieces into place you will note that you can seldom move more than one corner piece into place at the same time. This is because there are so many pieces to choose from, because the pieces are far apart on the puzzle and because it is difficult to visualize the proper movement of pieces to get them into position for multiple placement.
The fact that each corner piece has a mirror image simply further confuses the issue. Each piece you look at could go in either of two distinctly different areas on the puzzle. As a general rule you will just have to plod away to get 17 pieces into place.
Step Seven: The End Game
The methodology for the End Game is exactly the same in Megaminx as in Rubik's Cube. But most of the time, in the case of Rubik's Cube, you will find two of the final three pieces side by side. In the case of Megaminx, most of the time you will not find two pieces together as in Fig. 8a. This is going to make The End Game more difficult. The appropriate turns to make a successful End Game may be quite complex. Sometimes it may be helpful to solve only one corner piece while moving one which was already in place if this makes the final arrangement easier to visualize.
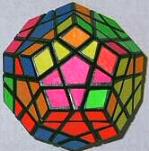
Fig. 8a
Fig. 8b
In Fig. 8a the pieces to be placed are red-orange-yellow, tan-orange-green and yellow-green-tan (you can see only the yellow color). The puzzle at the conclusion of the preliminary moves is shown in Fig. 8b. What were those moves?
According to Wieczorek and Snyder the use of The Ultimate Solution ..... "made the supposedly near-impossible Megaminx easily solvable on my first try. It is still a long process as pieces can be located at their antipodes, requiring many rotations to place them appropriately, yet it is as simple as the regular Ultimate Solution method."